ProcureFlow Docs

Create for a Known Supplier

Raise a direct-sourcing purchase request when you already know which supplier you want to use. The request goes through your organisation’s approval workflow before a Purchase Order is issued.

Last updated 16 July 2026


Who can use this?

Available to all roles in ProcureFlow.

Go to Purchase Requests

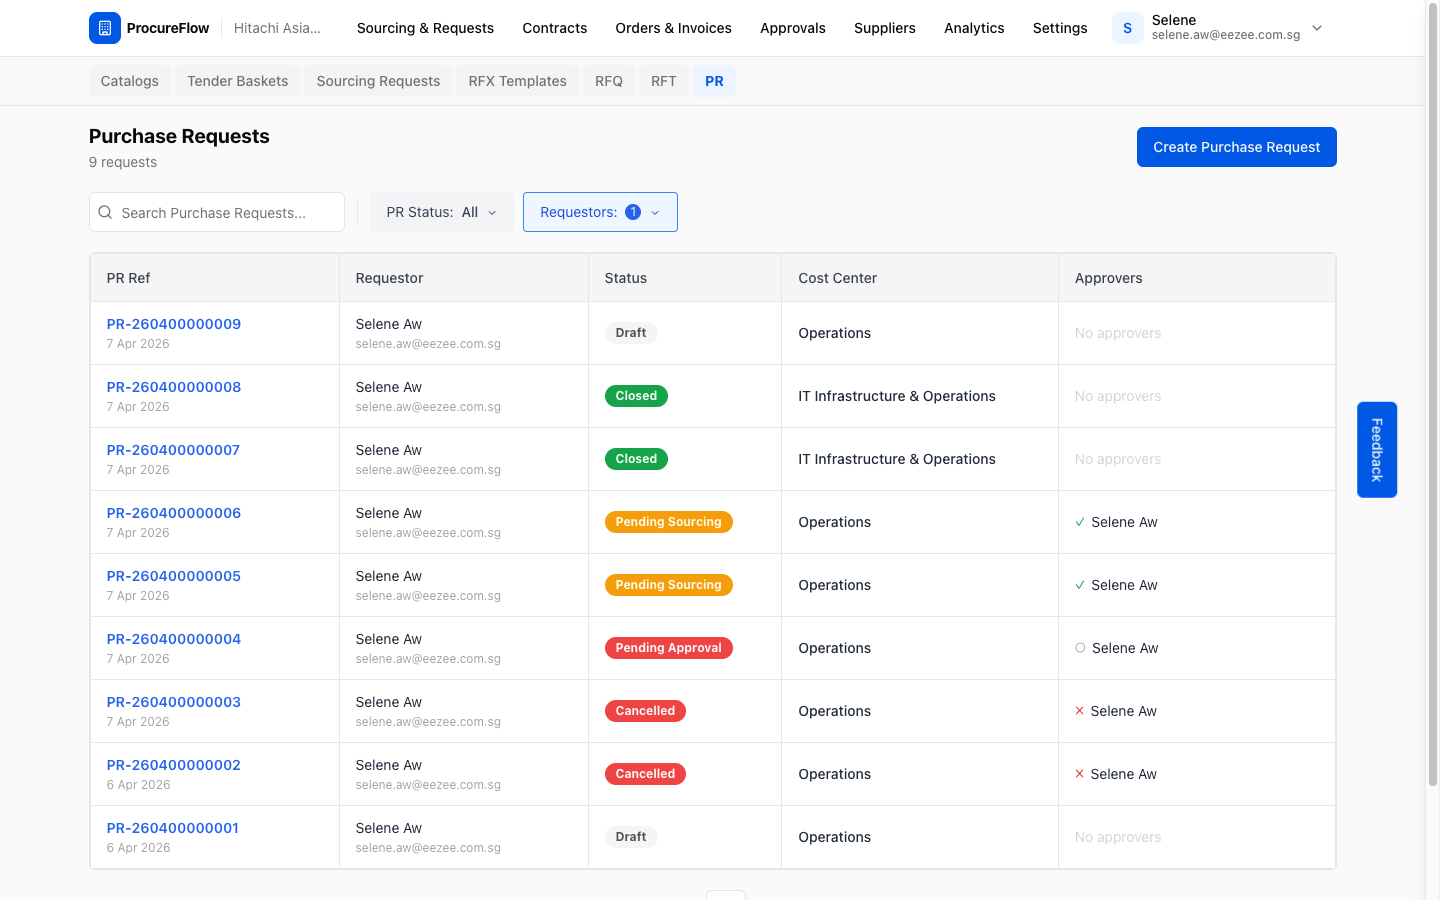
  1. In the left navigation, click Purchase Requests. You will see a list of all your purchase requests.
  2. To start a new one, click the New Purchase Request button in the top-right corner.
Step 1: Purchase Requests list. Click “New Purchase Request” to begin.

Open the create form and fill in the basics

The create form opens. Enter the following:

  • Subject (required): a clear, short title for this purchase.
  • Description (required): explains the purpose and justification.

Both fields are required before the form can be submitted.

Tip: A descriptive subject makes it easier for approvers to identify the request at a glance. For example: “Office Supplies Q3 2026: Singapore team.”
Step 2: Fill in the Subject and Description before proceeding.

Select a cost center

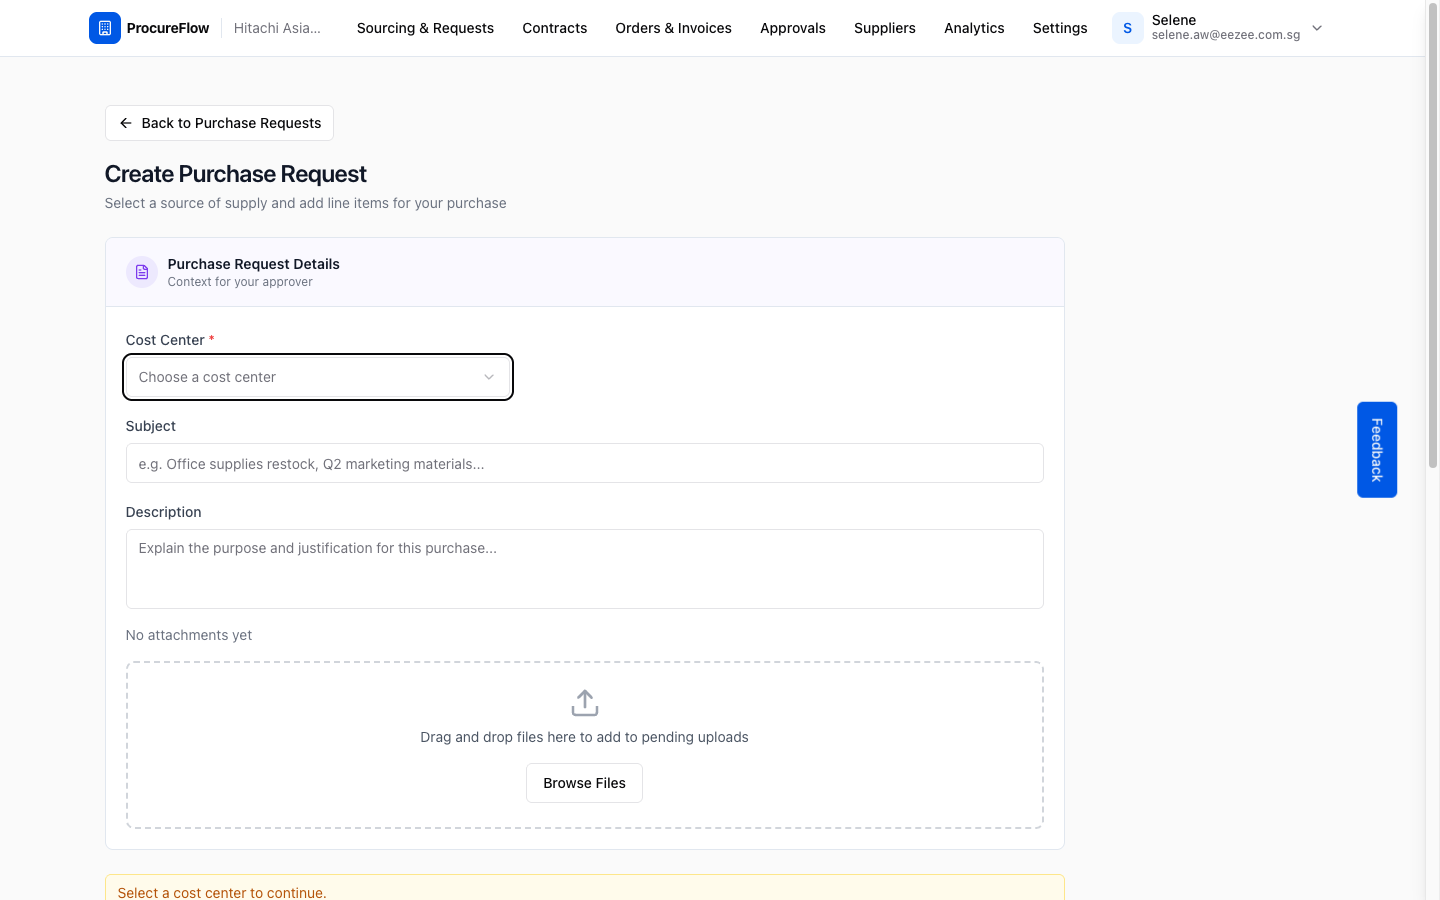
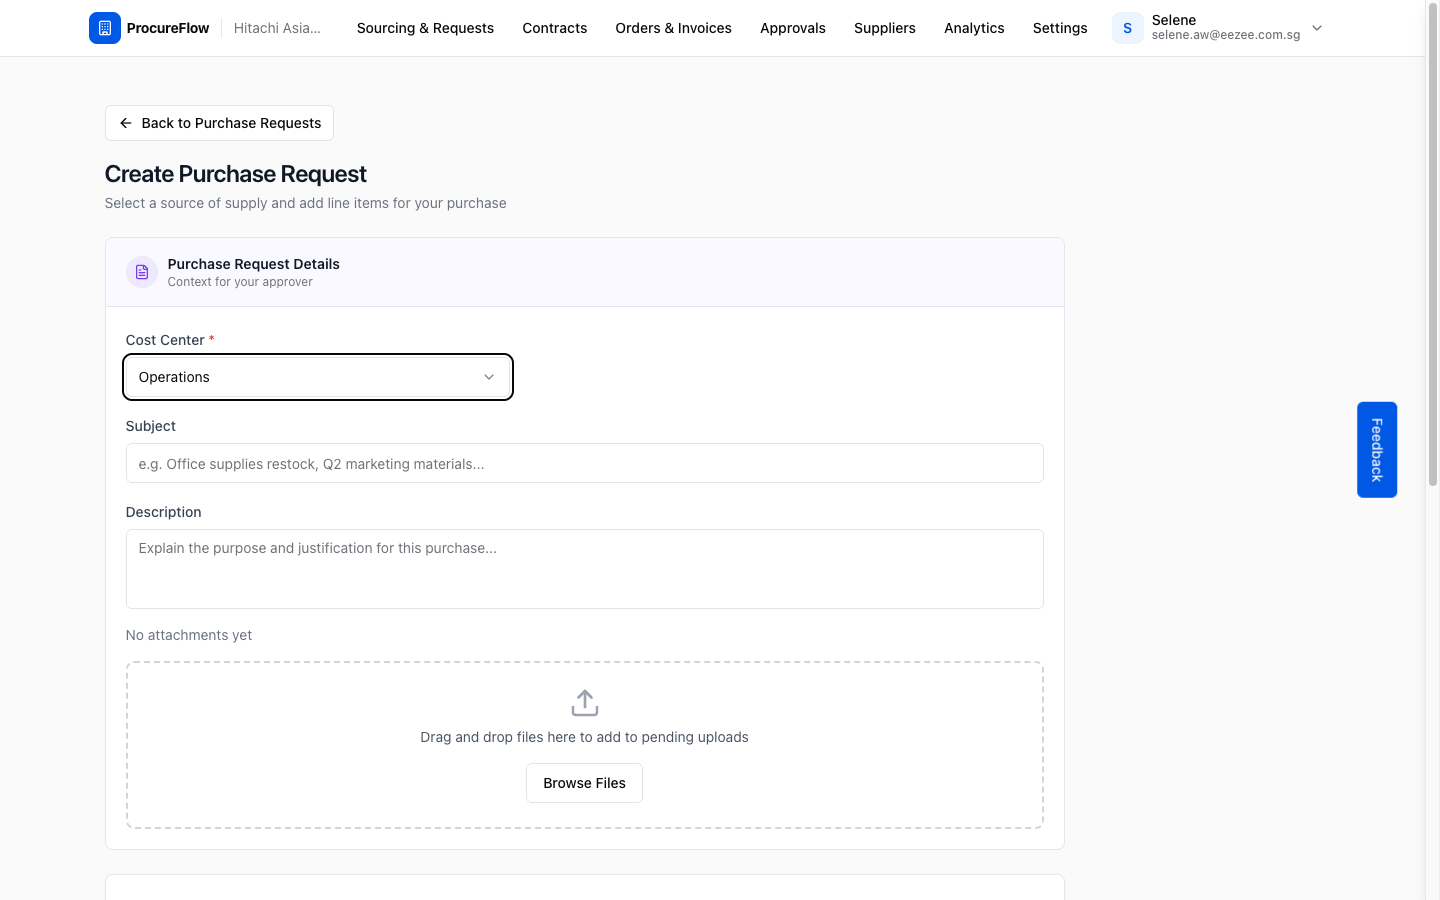
Click the Cost Center dropdown and choose the cost center this purchase will be charged to.

Selecting a cost center unlocks the rest of the form.

Note: The source of supply, supplier, and line-item sections remain disabled until a cost center is chosen. This ensures purchases are correctly attributed to the right budget.
Step 3a: Click to open the cost center list.
Step 3b: After selection, the remaining sections unlock.

Choose “I have a supplier” as the source of supply

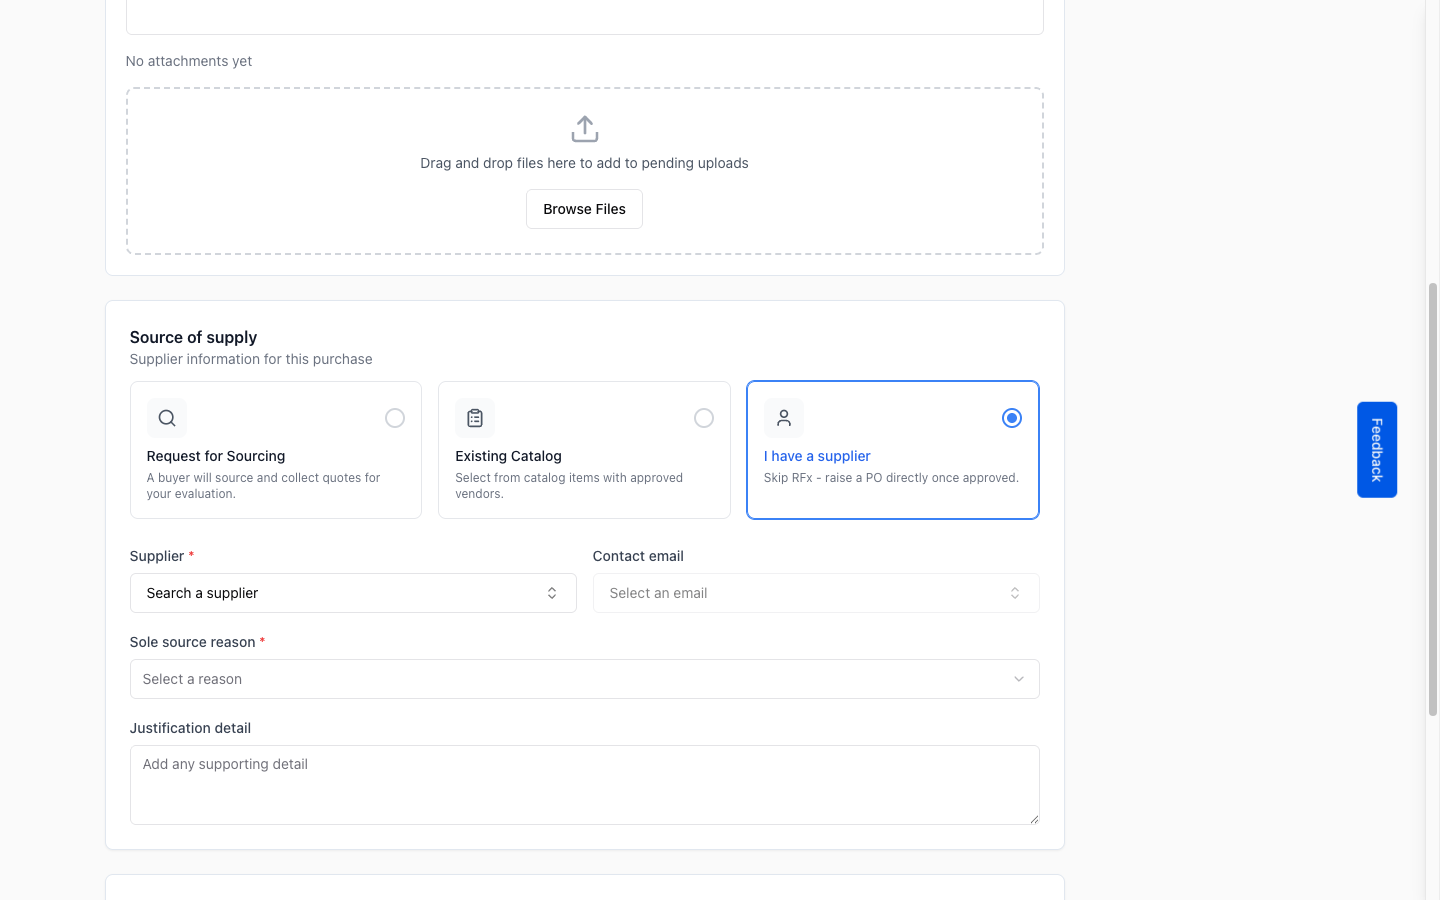
Under Source of supply, click the I have a supplier card.

This tells ProcureFlow you already have a chosen vendor and want to skip the sourcing process. A Purchase Order will be issued directly to that vendor once the request is approved.

Note: Other options: Request for Sourcing asks a buyer to collect quotes on your behalf. Existing Catalog lets you select from pre-approved catalog items.
Step 4: Select “I have a supplier” to proceed with a direct-sourcing request.

Select your supplier and provide a sole source justification

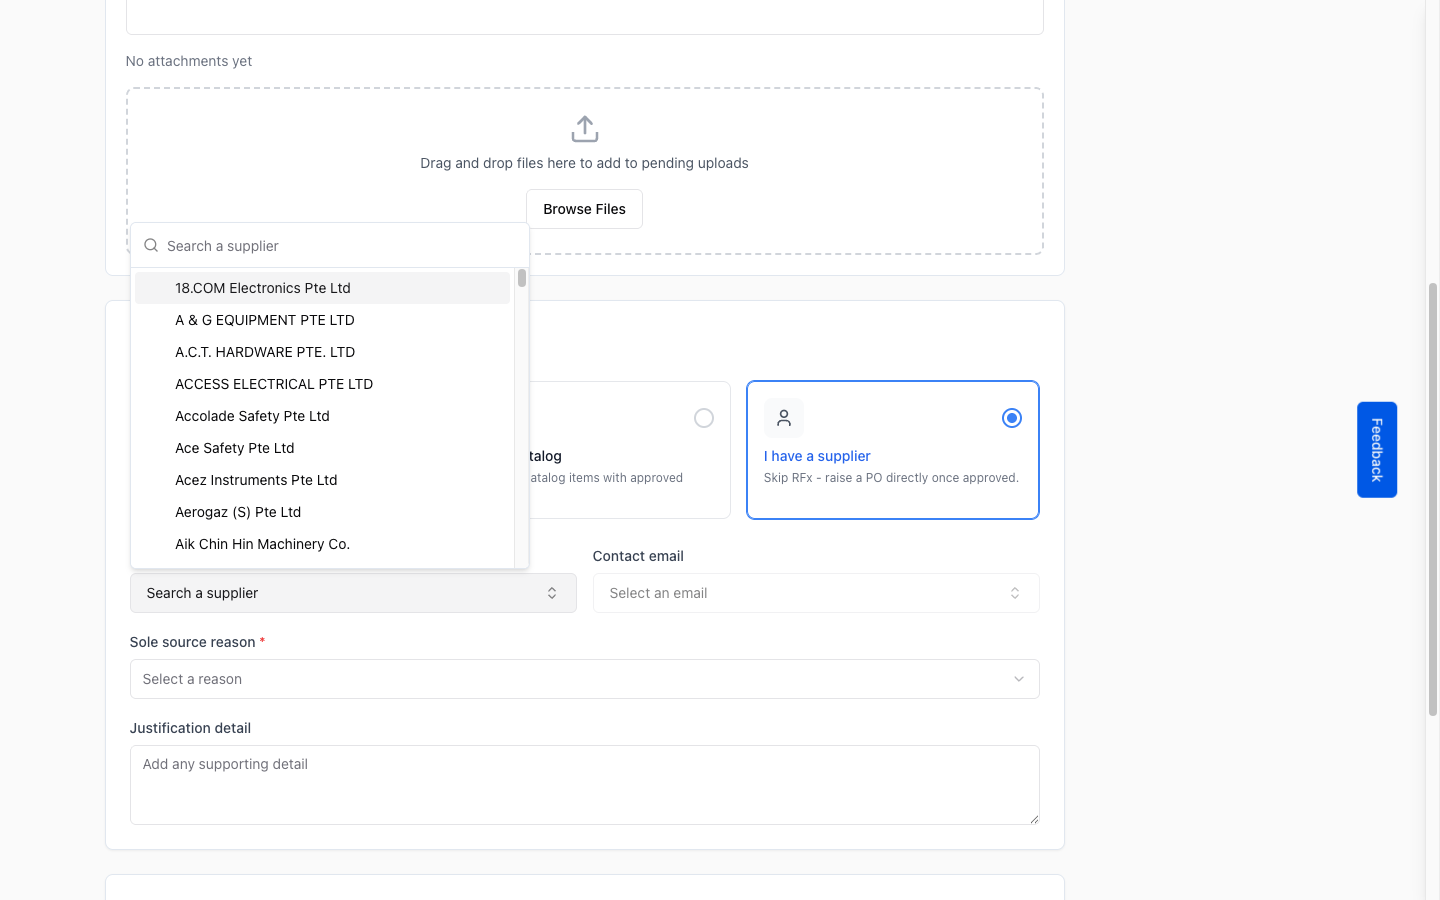
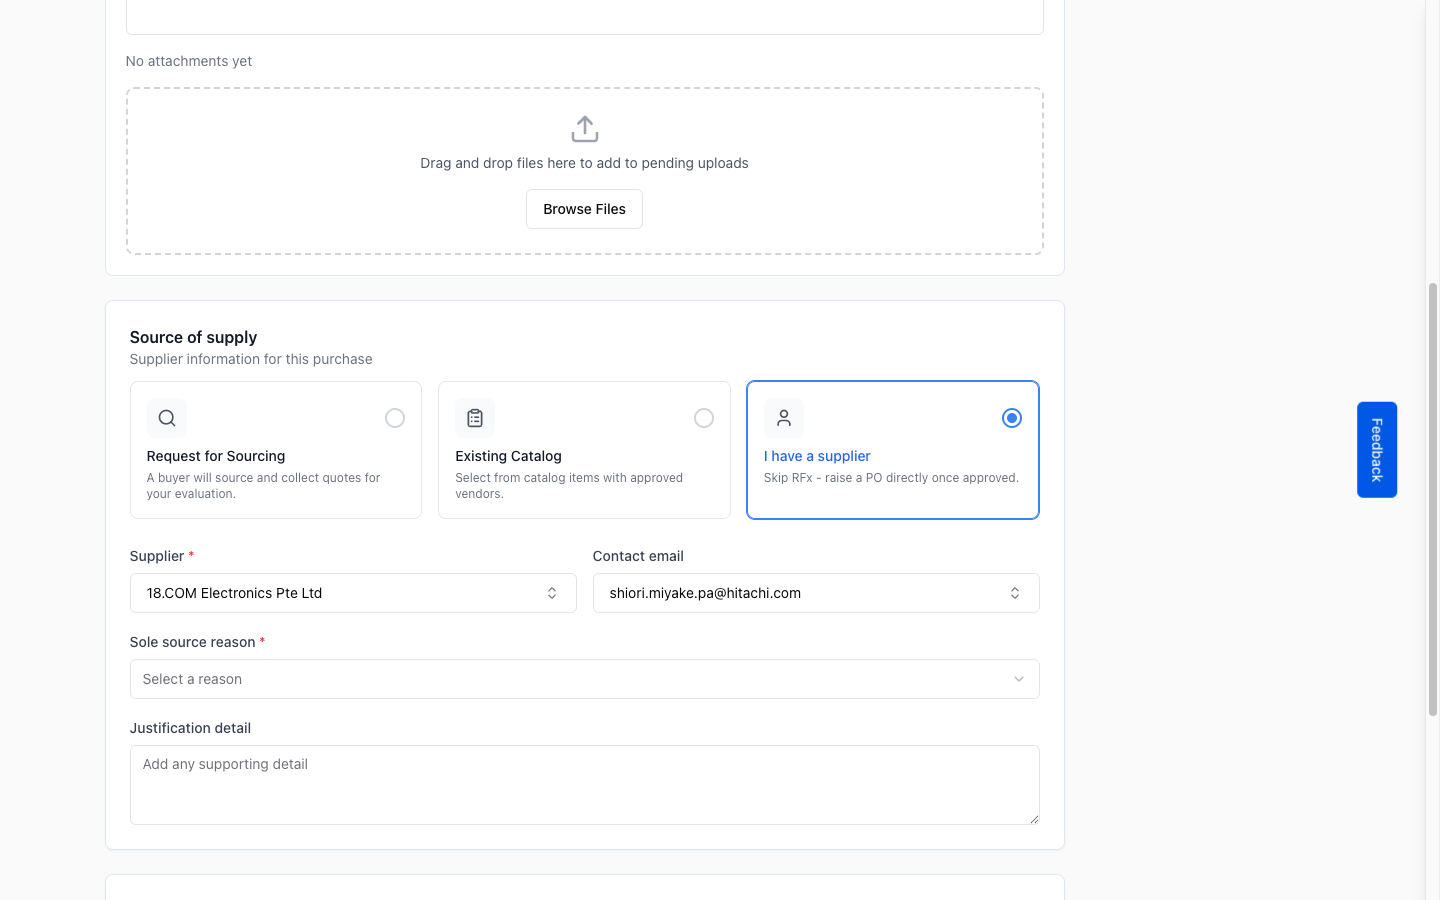
  1. Use the Supplier search to find and select your vendor.
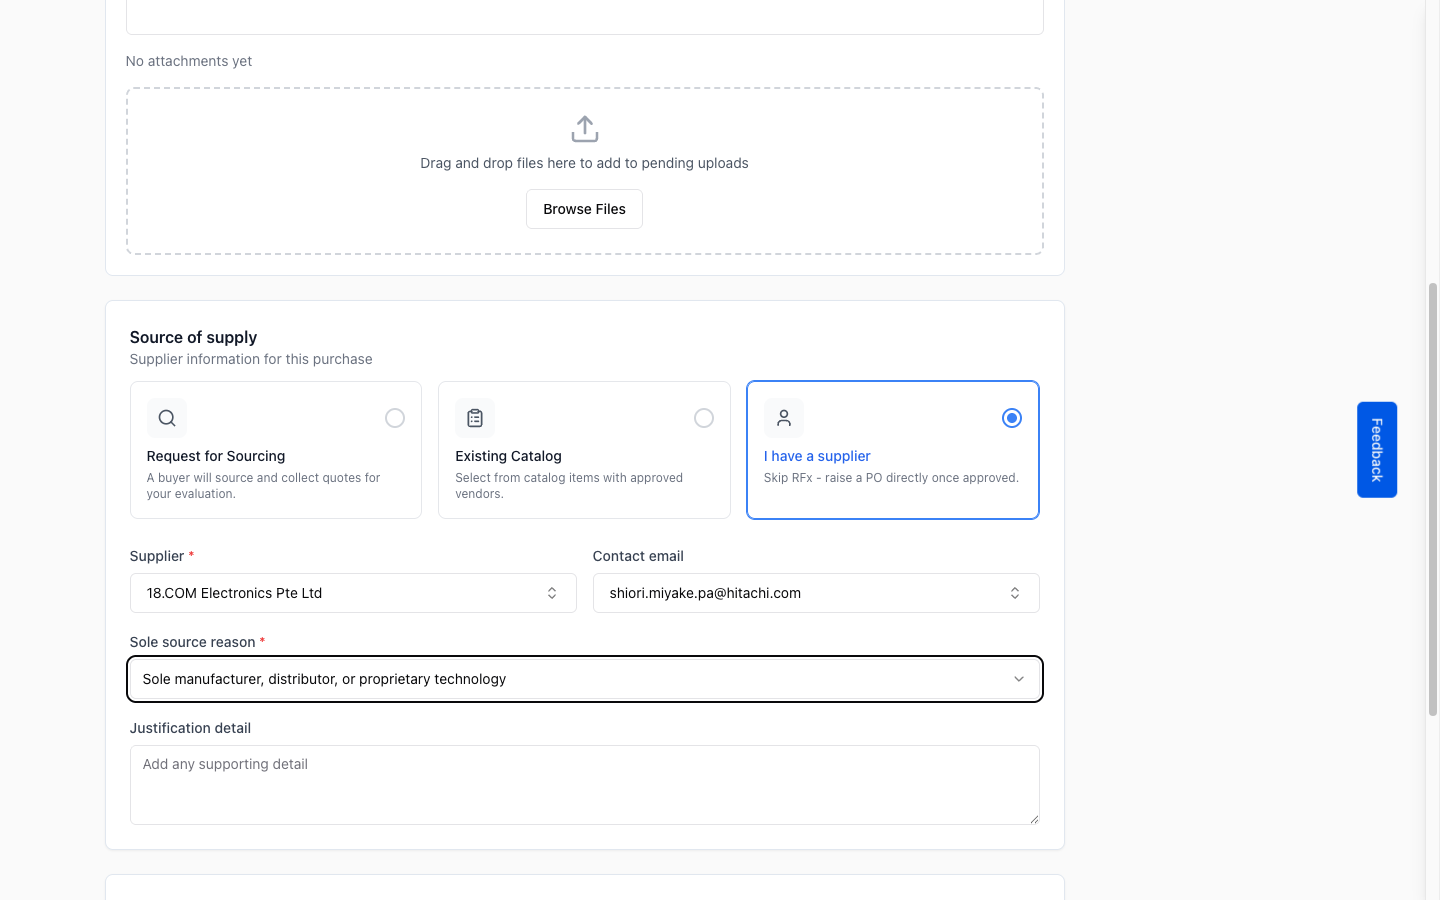
  2. Choose a Sole Source Reason to justify why this vendor was selected without a competitive bidding process.

Both fields are required.

Step 5a: Search for your supplier by name.
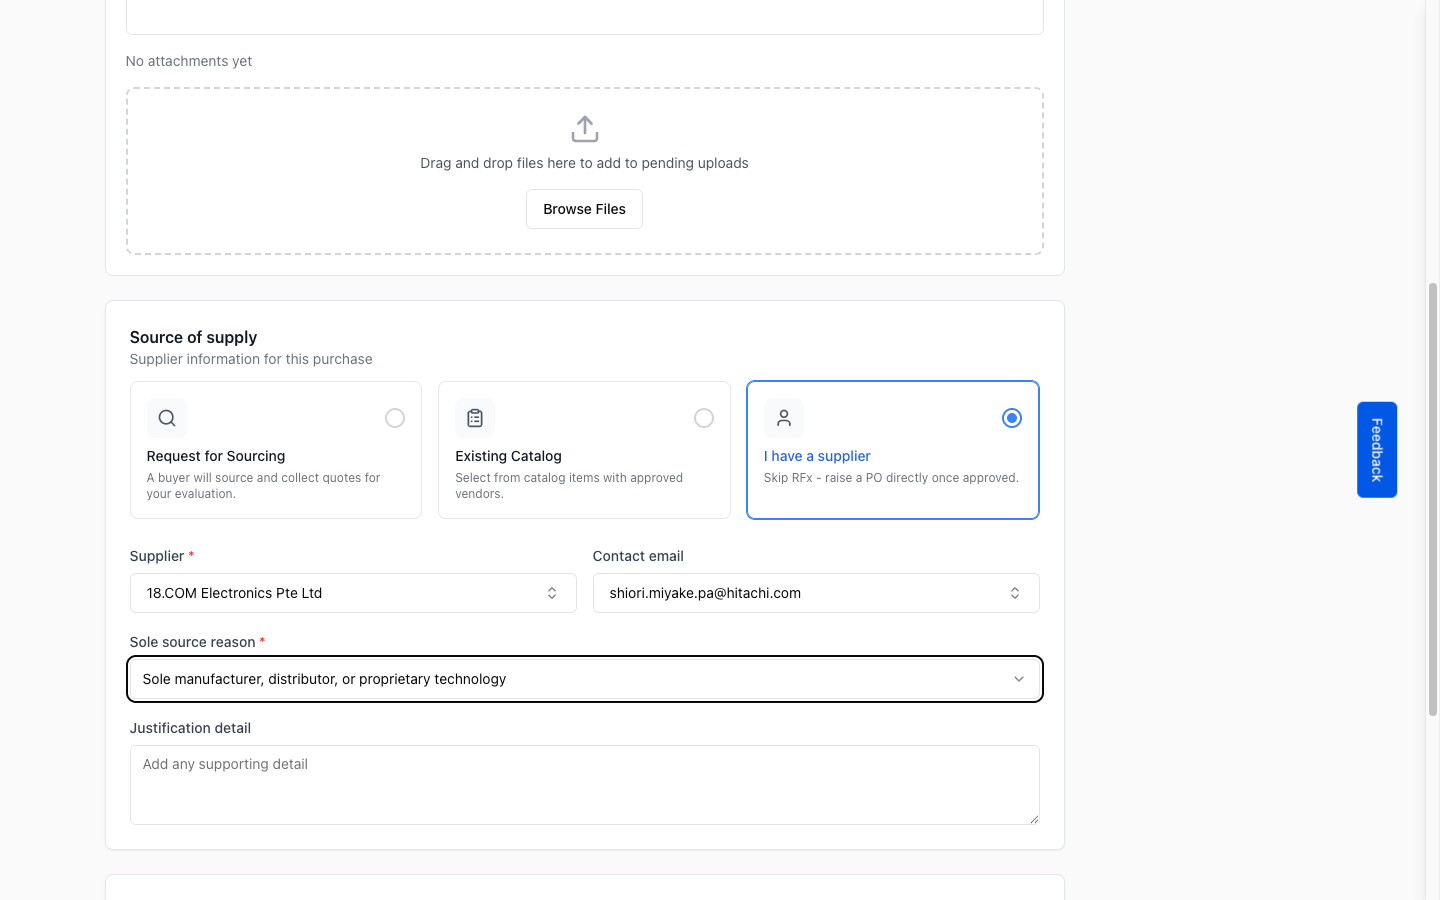
Step 5b: The selected supplier appears in the field.

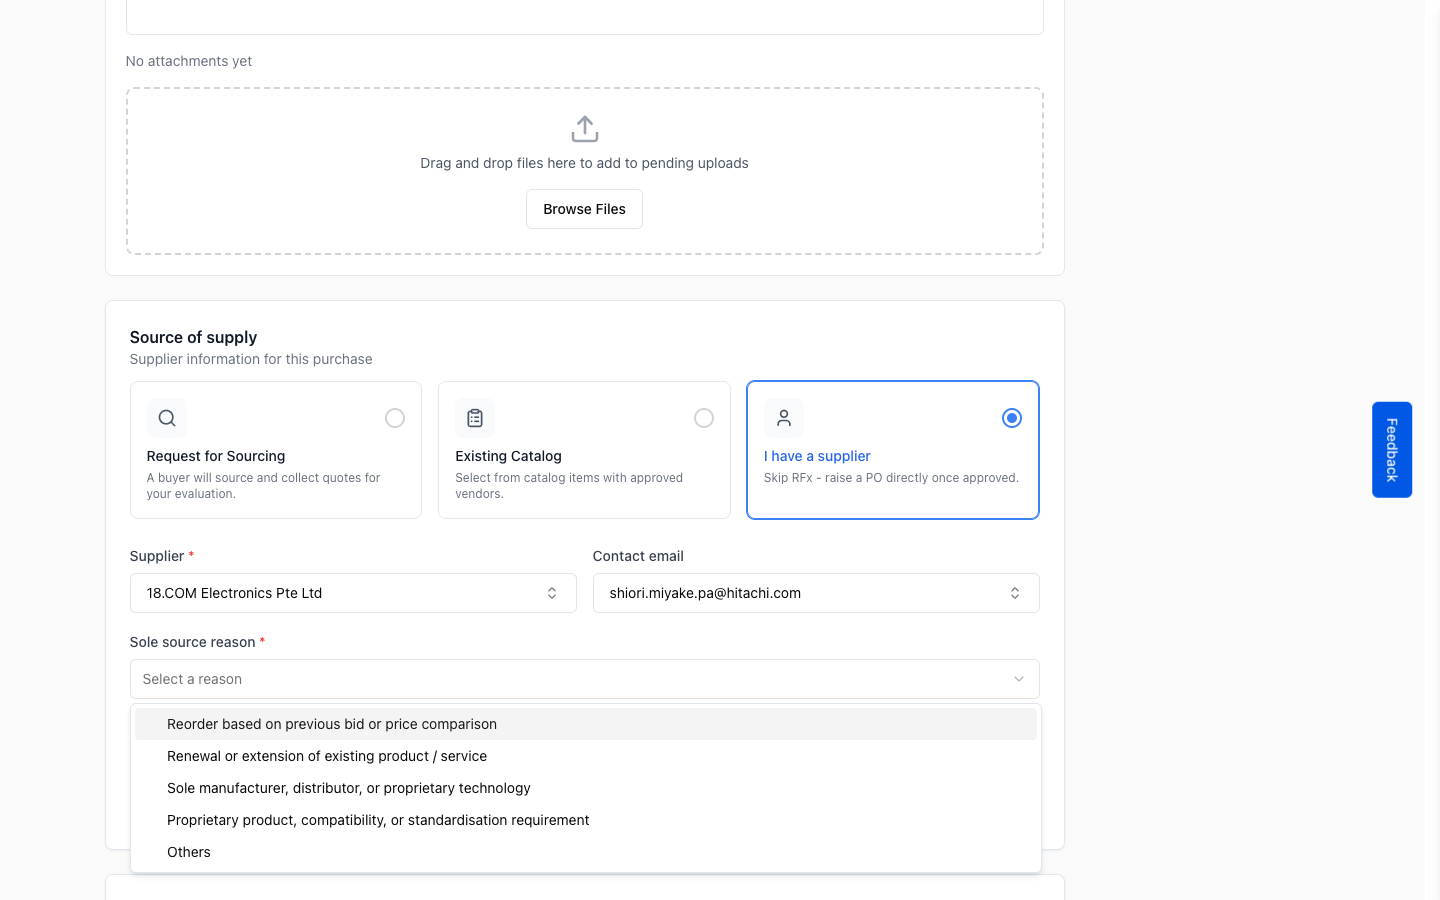
Sole Source Justification. Choose the reason that best describes why this supplier was selected without competitive bidding:

  • Reorder based on previous bid or price comparison: Use when you are reordering from a supplier who won a competitive bid or price comparison exercise in the past. Requires: a link to the previous Purchase Order that established the supplier.
  • Renewal or extension of existing product / service: Use when renewing or extending an existing contract, subscription, or service arrangement with the same supplier. Requires: a link to the original Purchase Order being renewed.
  • Sole manufacturer, distributor, or proprietary technology: Use when this supplier is the only manufacturer, authorised distributor, or holder of the proprietary technology you need. No alternative source exists. No additional fields required.
  • Proprietary product, compatibility, or standardisation requirement: Use when the product must match existing equipment, systems, or organisation-wide standards, and substituting another brand would cause incompatibility or break a procurement standard. No additional fields required.
  • Others: Use for any other justification not covered by the reasons above. Requires: a written explanation in the justification text field that appears below.
Step 5c: Open the Sole Source Reason dropdown.
Step 5d: Select the reason that applies to your purchase.
Important: Compliance note: Sole source justifications are audited. Choose the most accurate reason and, for “Others”, provide a clear written explanation. Inaccurate justifications may delay or block approval.

Add line items

Under Line Items, a single empty row is pre-filled for you.

  1. Enter the Item Title, Quantity, and Unit Price for your first item. Unit Price is required for “I have a supplier” requests.
  2. Use the Add Item button to add more rows.
Tip: Optional fields: UOM (unit of measure, e.g. “pcs”), Estimated Unit Price, and Need By Date help approvers assess urgency and budget impact.
Step 6a: One empty row is available by default.
Step 6b: Fill in the item title, quantity, and unit price.

Once all required fields are complete, the Create Purchase Request button at the bottom of the form will become active. Click it to submit.

Enter shipping and billing addresses

After submitting the form, ProcureFlow takes you to Step 2: Shipping & Billing Addresses.

  1. Select the delivery address for this purchase.
  2. Select the billing address.
  3. Click Next.
Note: Default addresses are pre-filled from your organisation settings. You can override them for this request if needed.
Step 7: Select delivery and billing addresses, then click Next.

Review the approval flow and raise the PR

Step 3: Approvals shows the approval workflow that applies to your request. Each stage lists the eligible approvers.

If a stage requires you to select a specific approver, click Select Approver and choose from the list.

Step 8a: Review the approval stages for your request.
Step 8b: Choose an approver when prompted.

Once all stages are assigned, click Raise PR on the right panel.

The request is submitted and all approvers are notified.

Step 8c: With approvers assigned, click “Raise PR” to submit.
Note: No approvals required: If your organisation’s workflow skips approvals for this request, you will see a message saying the PR will be converted to a Purchase Order immediately upon submission.

Purchase Request submitted successfully

A success screen confirms your Purchase Request has been raised. The page shows:

  • The PR number.
  • The approval stages.
  • Each approver who needs to review it.

Approvers will receive an email notification.

You can track the approval status from the Purchase Requests list at any time.

Step 9: Your PR is submitted. Approvers are notified automatically.
Tip: What happens next: Once all approvers approve the PR, ProcureFlow automatically generates a Purchase Order and sends it to the supplier.

On this page